Monday, April 28, 2008

Lemon Meringue Pie--Gluten Free

Gluten free pie crusts were the bane of my existence. I was especially irked because I had just recently decided upon the perfect flaky pie crust recipe with wheat flour, and that, of course, just didn't work with gluten free flours. Finally, my good friend Melissa told me that the best thing is to use the Gluten Free Pantry mix. Which is excellent. But, I had a panic last Thanksgiving when I was slated to bring pies for our dinner, and the stores were out of the mix. Mel had to bale me out by sharing hers with me. I decided then that I would no longer have to rely on a mix to make a great pie crust. So, I tried a few more recipes from scratch, only to be totally disappointed. Since the mix is so great, I've used it as a template for a recipe from scratch. I also don't personally need to make 4 pie crusts at a time, so this is what I've created, adjusting the ingredients to make one double crust:
1 cup rice flour
1/4 cup potato starch
1/4 cup corn starch
1 Tbsp sugar
1/2 tsp xanthan gum
1/2 tsp salt
1/4 tsp baking powder
5 Tbsp butter flavored shortening
5 Tbsp unsalted butter
1 egg, beaten
1 Tbsp ice water
1 1/2 tsp cider vinegar

Mix together dry ingredients in a medium bowl. Cut butter and shortening into small pieces and cut into dry mixture, until it forms chunks the size of peas. In a small bowl, combine wet ingredients. Add all at once to mixture and, using a fork, combine until it forms a ball. Chill for one hour. Divide the ball in half and roll out in between two pieces of wax paper, or plastic wrap.

Lay out and press into pie plate. Poke bottom of pie crust and bake at 425 for 12 minutes, until golden brown. Set aside to cool.
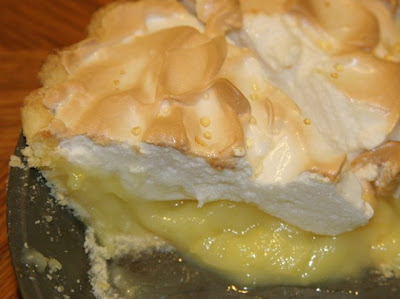
Filling

3 eggs, separated
1 1/2 cups sugar
3 Tbsp GF flour
3 Tbsp cornstarch
dash salt
1 1/2 cups water
2 Tbsp butter
finely shredded peel from one lemon
1/2 cup lemon juice

Set egg whites aside for meringue. Mix sugar, flour, cornstarch and salt in medium saucepan. Gradually stir in water, cook over medium-high heat, stirring constantly until mixture is thickened and bubbly. Reduce heat; cook and stir two minutes more. Remove from heat. Slightly beat egg yolks in small bowl with a fork, gradually add about 1 cup of the thickened mixture in with the yolks. Pour egg yolk mixture into remaining hot filling in saucepan. Bring to a gentle boil. Cook and stir 2 minutes more. Remove from heat. Stir in butter and lemon peel. Gently stir in lemon juice. Keep filling warm while preparing meringue.

3 egg whites
1/2 teaspoon vanilla
1/4 teaspoon cream of tartar
6 Tbsp sugar

In a large glass mixing bowl, combine egg whites, vanilla and cream of tartar. Beat with an electric mixer on medium speed about 1 minute or until soft peaks form.
Gredually add sugar, one tablespoon at a time, until the sugar dissolves and forms stiff, glossy peaks.

Pour lemon filling into pie shell. Immediately spread meringue over hot filling, carefully sealing to edge of pastry to prevent shrinkage. Use the edge of the knife to create peaks in the meringue. Bake at 350 for about 15 minutes, or until the peaks of the meringue are a golden brown.

Cool for about an hour, then transfer to the refrigerator and chill for 3-6 hours before serving (so the filling properly sets up).

Sunday, April 27, 2008

Caramel Popcorn

No lie: John's first reaction after being diagnosed with celiac was to ask the doctor if he could still eat popcorn. Of course, he prefers it all buttery and salty, but we all like this easy and wonderful caramel popcorn recipe. It's obviously gluten free, but it's the best, and easiest recipe I've ever done. My family got this recipe from our neighbors year ago and we've impressed people with it ever since. I remember when John's brother lived with us for a semester that he even tried to use this recipe to impress dates.
Here goes:

1 bag microwave popcorn (try to use something as plain as possible, or pop your own)

1/2 cup brown sugar
1/4 cup butter
2 Tbsp Karo Syrup (I have liked to use the brown sugar variety)

Heat the above ingredients in a saucepan on the stove at medium high heat, stirring, until butter and sugar melt, and it starts boiling rapidly. Make sure that this cooks long enough, although if you cook it too long, it gets hard. When it's nice and foamy and about the color of a brown paper bag, remove from heat and add
1/4 teaspoon vanilla
1/8 teaspoon baking soda

When you add the vanilla it will start to sizzle and you want to mix these in quickly as they cause a chemical reaction that makes the caramel harden and be chewy on your popcorn. When all mixed together, pour over your popped popcorn and mix to coat evenly.

This is just the recipe for a small batch, usually it's doubled, though you have to have friends over for that. and if you notice, the increments just keep being cut in half as you go down the list of ingredients, so it's hard to forget!

Friday, April 25, 2008

Snickers bar Cheesecake

So, this is another of the cheesecakes from my birthday bash, but the recipe was requested by my mom for Gustavo's graduation party. It's a really rich cheesecake, and it's one of the few I've ever had where I only need one slice. I tried to add a topping to my recipe to mimic that of a snickers bar, but you can do what you like. I love using the GF Homemade Oreo recipe for this, they're excellent!
Snickers Cheesecake

Yield: 12 Servings

CRUST
1 1/2 c crushed Oreo cookies (my gluten-free version, recipe here)
5 Tbsp unsalted butter; melted
3/4 c peanuts; dry-roasted, ground

Spray 9” springform pan. Combine cookie crumbs and butter, press onto bottom and up sides of pan. Chill while preparing filling.

FILLING
32 oz cream cheese; softened (I use 1 pkg full fat, and 3 Neufatchel cheese)
3 eggs
1 c sugar
1 1/2 t vanilla
1 c peanut butter; softened
15-16 fun sized Snickers Bar; in small dice


Position rack in center of oven and preheat to 300 F.

Using electric mixer, beat cream cheese, peanut butter, and sugar in large bowl until fluffy, about 3 minutes. Add eggs 1 at a time, beating just until combined after each addition. Beat in vanilla. Fold in Snickers bar chunks.

Transfer filling to prepared crust. Place springform pan in oven. To prevent cracking, put a small baking pan with water in the oven with the springform pan. Bake until cheesecake puffs and edges crack slightly, about 1 1/2 hours.

Transfer cake to rack. Run small knife around sides of cake to loosen.
Cool completely.

Topping:

1 handful Kraft caramels
1-2 Tbsp whipping cream
½ c chopped dry roasted peanuts
½ c milk chocolate chips, melted

Melt handful of caramels with a few Tablespoons cream, when smooth, spread over top of cake. Sprinkle immediately with chopped peanuts. Melt chocolate chips in a baggie in the microwave. Cut small hole in corner of baggie and drizzle chocolate over top of cake. Cover cake with plastic wrap and chill cake overnight.

(Can be prepared 3 days ahead. Cover and keep chilled.)

Sunday, April 20, 2008

Making Cake Gluten Free

This is one of the cakes to make my mother famous (at least among her acquaintances). We have one old friend who requests this cake whenever she comes to visit. And this was the groom's cake John chose for our wedding. It also became one of the first recipes to establish me as a great baker. John was sad to think he'd never be able to eat this again, but I was too nervous to modify it, until last year, when I had a somewhat successful attempt. This year, after more cake successes, I tried again, and was very happy with the results. I still have to modify temperature and use regular butter instead of unsalted, but now I can happily add this back to my repertoire.
So, I'm not sure that I'll take the time to post the long, complicated recipe for this particular Lemon Marzipan cake, but will revel in the success of making it gluten free, and discuss the things I have learned about adjusting cake recipes.
1) Choose your recipe wisely. If it's a really light, really fluffy cake whose recipe requires a lot of flour: don't try it. Dense cakes, especially chocolate ones, modify perfectly. Also, the best yellow cake I've modified came from a recipe using cake flour, prized for its lower amount of gluten and therefore easier to modify. Also, cakes that require more eggs (like 3), or that require dividing the egg and folding the whipped whites into the batter hold their shape better, so do well with gluten free flours.
2) Make sure the cake has a great frosting or something to help out the flavor. Somehow, rice flour mixes don't make for the tastiest cakes, but something like this, where the texture of the cake is what is needed with the ultra flavorful lemon buttercream and marzipan, works perfectly. I also find that the yellow cakes I've made taste marvelous with great chocolate frosting.
3) I have found a curious combination of flours that seems to work very well with cakes and sweet breads: 2/3 of the recipe as Featherlight flour, and the remaining 1/3 GF mix. I think I was introduced to this by the Eating Gluten Free girls, but I'm not certain. I've been using it for a little while adjusting recipes, and I've been happy with it every time.
4) If in doubt, add an egg. If the recipe doesn't already call for an insane amount of eggs, I add one. Somehow, it makes things hold together better and come out nicer.
5) Add xanthan gum, about 1/2 teaspoon per cup of flour used, although typically you don't need more than 1 teaspoon per recipe.
6) Cakes need to be cooked thoroughly to hold their shape, which is a problem with gluten-free flours. Holding their shape that is, not being cooked thoroughly. Because of this fact, I sometimes favor a lower temperature for a longer time period so it cooks slowly and evenly. Maybe even try it in a water bath.

For this cake, I added an egg, an extra 1/2 teaspoon baking powder, and an extra egg, using the same amount of flour called for but adjusting the mixes as I described above. It worked really well. I wouldn't necessarily recommend the cake on its own, but the texture was pretty perfect (barring the outside that was overcooked because I cooked it at too high of a temperature for my dark pan) and it's not supposed to stand on its own but meld with the other flavors.

Enough of my idle prattle, these are some of the things I've learned about baking gluten free cakes. The thing that stands out the most for me though is, it's possible. I've made good special occasion cakes gluten free, and that's something I didn't think possible before.

Friday, April 18, 2008

GF Homemade Chocolate Sandwich Cookies (fake Oreos)

So, it was my love of all things cheesecake that brought me to discover this recipe and start to modify it. I've posted it on my family blog before, but have since changed it, and I plan to tweak it again. These make such an excellent crust for cheesecakes requiring a chocolate cookie crust. I guess it was actually the frosting that got me thinking I could make a good oreo. For my daughter's first birthday, I made a chocolate cake. I wanted white frosting, but I didn't want a buttercream frosting with my chocolate cake, so I devised a plan to make white chocolate frosting by modifying one of my favorite recipes from Nigella Lawson. The frosting was an amazing success and I decided it would be the perfect filling to an oreo cookie. I went online and found a gluten free fake Oreo posted on the blog "Hey, that tastes good". I made them, and liked them, have now adjusted them slightly, and here we are now. I'm posting the recipe I used to make these exact cookies.

1/2 cup GF flour
3/4 cup Featherlight mix
1/2 cup unsweetened cocoa powder ( I used Hershey's Special Dark cocoa, so excellent!)
1/2 t xanthan gum
1 1/2 t baking soda
1/4 t baking powder
1/4 t salt
1 cup sugar
5 T unsalted butter, room temp
5 T butter flavored crisco
1 large egg plus 2 egg whites

Combine dry ingredients in a stand mixer. Add butter and shortening, in pieces, mixing on low until combined. Add eggs one at a time, then mix until incorporated. Drop by SMALL teaspoonfuls onto cookie sheet lined with parchment. After you've made uniform balls, press the cookies down flat (this time I was able to use the heel of my hand to push them down, but if the dough is too sticky, I've used the underside of a glass coated continually in powdered sugar) so they will be more like a thin oreo cookie.
It's best to make these small so the chocolate cookie doesn't overwhelm the filling. Bake at 350 for 6-8 minutes. (This temp/time combo makes a really crisp thin cookie, much like the actual oreo, but play around if you want it softer, or chewier, I know I do.)

Filling:
1 cup plus 2 T unsalted butter, room temp
2 cup powdered sugar, sifted (really, you should do it)
1 T vanilla
1/2 cup white chocolate chips, melted

Melt chips 1 min on high in microwave, mix until totally melted and smooth. Let sit. Beat butter until smooth. Add sifted powdered sugar. Once the butter and sugar and light and fluffy, add vanilla and melted chocolate. Mix well. Using a plastic bag with a half inch opening, pipe a generous teaspoonful of filling on one side, then top with a similar sized cookie and push together to even out the filling. This is a big amount of frosting, because they really taste great with a lot of filling. You can halve it if you'd like less. The cookies aren't very sweet, so putting them with a lot of filling makes for a great sweetness. This makes about 30 sandwich cookies.
Enjoy!

Favorite Flourless Peanut Butter Cookies

When John was diagnosed three years ago, we at least knew we'd have our favorite Peanut Butter Cookies to eat. My sister gave me this recipe for flourless cookies about 4 years ago, and we loved them. I remember her giving me the recipe and thinking, why would you need to make flourless cookies? But the recipe was so simple, and I loved that they only made two dozen cookies, since I can eat all of them in one sitting. When John was diagnosed, I knew that a lot of other people had peanut butter cookies they liked. When I finally looked at another recipe, I realized it was different, and we tried them. I honestly think I threw them away because they were so bad in comparison. Remember, these were our favorite cookies even before we'd ever heard of Celiac or a gluten-free diet.

1 cup peanut butter
1 cup light brown sugar
1 tsp baking soda
1 egg
1 tsp vanilla

Mix together until combined. I like to add about a cup of chocolate chips to these. Our favorites (and pictured) are the Nestle's Swirled Peanut Butter and Milk Chocolate chips. They taste excellent. If I go with chocolate, I stick with the milk variety. Chopped Hershey bars are excellent. Or, if you don't want chocolate, the best way to make them plain is with crunchy peanut butter. I don't know why this is, but the Adam's natural crunchy peanut butter is so fabulous in these. It makes for a really chewy and delicious cookie. As with most gluten-free cookies, these don't keep that well. They dry out pretty quickly, so you want to share them.

Drop the cookies in teaspoonfuls on the baking sheet and bake at 350 for 8 minutes. This recipe makes about 2 dozen.

Wednesday, April 16, 2008

Ohukaisets (Finnish Pancakes)

We often love to have breakfast for dinner and while our favorite is typically crepes, I didn't have enough eggs for my regular recipe, and I thought I'd try the recipe I had for these Finnish Pancakes that required only one egg for the recipe we used. I still made them in my crepe pan using my crepe turner (as pictured below) but I realized that these take more butter in the pan because they stick more, and they're a bit sweeter. But we really did enjoy them. While the recipe from "Life Tastes Good Again" said to serve them with strawberry jam and whipped cream, we preferred the savory ones.

Gluten Free Ohukaisets (Finnish Pancakes)

1 1/4 c. milk
1/4 c. sugar
1/4 tsp. salt
2 T. oil
3/4 cup + 2 T. featherlight mix
1 egg

Beat ingredients together
Pour into pan and swirl around so that it covers the pan. When this is cooked on the bottom, flip it over and cook the underside.
Remove from pan and cook until finished. I just stack them on a plate and wait to eat them.
Then, if I want savory ones, I'll take the cooked cake, put some ham and cheese down the center, and roll it up in the middle of the griddle and heat up. The one on the left in the top image shows this. The one on the right has strawberry jam spread around, then rolled up, and powdered sugar sprinkled on top. These were good.

Sunday, April 13, 2008

Molten Chocolate Cakes

So, recipes don't always work the way you expect them to, or even the same way each time you make them. That can be the beauty of this recipe in particular. Although I feel that it's often hard to get a consistent product, they taste good however they're cooked.
This weekend I felt like everything I made seemed to fall a bit short of my expectations. But that happens, especially since I tend to have ridiculously high expectations. I thought of not posting this recipe because of that, but this blog is about reality when baking gluten-free. When I make them again and they work better, I'll post a different picture, but this is how they turned out this time and they were still good, and everyone enjoyed them, even though there was only one celiac eating them.
It's the dense chocolate cakes that work the best with rice flour blends. I also have a recipe for these with no flour, but have used this one more consistently because of its simplicity.

4 oz semisweet chocolate
1/2 cup butter
1 cup powdered sugar
2 eggs
2 egg yolks
1 tsp vanilla
6 Tbsp GF flour

Melt the butter and chocolate in microwave safe bowl for a minute on high. Stir so that all the chocolate melts. Then mix in the powdered sugar with a wire whisk. When all of this is incorporated add the eggs and yolks. Again, whisk until all the eggs are combined. Add vanilla and flour and mix well again. Divide evenly among four greased ramekins (3/4 cup size) and bake in 425 degree oven for 12-14 minutes. Let sit for about 1 minute after removing from the oven, then run a knife around the edge of each ramekin, and turn onto a serving plate. Makes 8 servings of 1/2 a cake.

The cooking time is something that you have to watch, and tailor to your own liking. My oven rack was a little too high today, and so the tops were burning. I took them out early, but didn't want them too gooey, so in lieu of removing them from the ramekins immediately, I let them sit, and then they got too cooked, so I didn't get the lovely gooey chocolate lava I was hoping for.
As you can see, they were pretty well cooked through, but they did still taste gooey and good, just not the sort of hot fudge coming from the center I love to have. As you see in the above image, we love to serve these with ice cream. These are really rich, and, unless you're a purist, really need something to cut that. While they're good with cream, they're excellent with ice cream. Here we paired them with a great chocolate peanut butter ice cream we get from a local dairy.

Thursday, April 10, 2008

Creme Brulee Cheeseckake


Confession: in the week I spent in Paris, I never ate a single pastry. It's sad, but true. And, while in Senegal, I ate more ice cream at the Patisserie than I did pastries. So, my first real experience with an authentic French pastry was in Provo, Utah, of all places. And it opened right before I moved away. In my trips home to visit family, I have frequented the shop and my sister Emily introduced me to the creme brulee cheesecake. As soon as I ate it, I knew I could make it gluten-free and had to try to re-create it. Though I haven't been able to completely duplicate it, I've come close, and I assume that I'm as close as I want to get without adding loads more calories and cost to my creation. We're having houseguests this weekend and so the cheesecake is the decided dessert for Friday. I have a picture from my birthday cheesecake-bash, so I'll add that with the recipe, and will add more images when I make it tomorrow night.

The thing that drew me to this cheesecake was the crust. I had made a similar crust with a white-chocolate raspberry pastry I'd made the summer before, and so I knew I could make it for this, and, being a nut crust, fits right into our gluten free parameters. This is how I make it for the cheesecake:

1 cup walnut pieces

1/2 cup pecan pieces

¼ cup sugar

4 Tbsp unsalted butter, melted


Pulse nuts and sugar in food processor until ground, add melted butter and pulse till consistency of moist sand. Press in bottom of springform pan and bake at 350 for 12 minutes or until golden.

Then, the premise for making the cheesecake is to make a basic cheesecake, and add a creme brulee. You don't have to do this, but I find it works very nicely.

24 oz cream cheese (I use one pkg full fat cream cheese, and two pkgs Neufatchel cheese)
2/3 cup granulated sugar
3 TBSP sour cream

1 1/2 tsp vanilla


Blend above ingredients well in the bowl of a stand mixer. Add 3 eggs, one at a time, mixing after each addition.

In the meantime, heat 1 cup heavy cream on medium low heat in a small saucepan. If I have it, I like to slit open a real vanilla bean and scrape out the seeds and heat it with the cream and 2 Tbsp sugar. If no real vanilla beans are available, then use 2 tsp vanilla extract. Heat until bubbles start to form on the sides of the pan, but do not let the cream scald. Let sit to cool slightly and then add to bowl while mixer is on low. (If you've used the bean, strain the cream into the cheese mixture)

Position a rack in the center of an oven and preheat to 325F. Have a pot of boiling water ready (I just heat the tea kettle).

Pour the cream cheese mixture into the pan, spreading it evenly. Line the outside of the pan with aluminum foil, shiny side out. Use two sheets, going opposite directions to make sure no water can get into the cake and sog the crust. Place the cheesecake in a medium roasting pan and add boiling water to fill the pan halfway up the sides of the spring form pan. Bake until the filling is just set in the center, about 1 hour.

Transfer the cheesecake to a wire rack and let cool to room temperature. Remove the foil, cover and refrigerate at least 4 hours.

To serve, remove the cheesecake from the spring form pan and sprinkle about 1/4 cup sugar evenly over the cheesecake. Using a kitchen torch, melt the sugar according to the caramelizing sugar instructions until evenly melted and golden. I have a small torch, and it takes forever to do this. You may also not want to purchase a torch, so you can place the cheesecake directly under the broiler and watch for the sugar to melt and carmelize. It really tastes great.

I especially like to serve this with fresh berries.

Pizza Crust

So, I made the pizza again tonight, and while I won't add the recipe again, I'll add some more pictures of the pizza while it's fresh.
I also added an image of the crust itself before the toppings are added. I find that it's important to make sure that the crust is cooked well enough at first that it doesn't sog, but that it's not overcooked so that it gets too tough or burnt. I felt like this was a little too cooked, but actually worked well. I just made sure to only cook the pizza with toppings for 10 minutes longer, so as to melt the cheese and warm everything through.
As you can see, we have to sometimes do things half and half for my four-year-old who doesn't want too many toppings. She prefers just cheese, but I have found that if I have too many toppings on one side, and just cheese on a part, that the cheese gets quite browned, so it needs to be more evened out, so here I put the pepperoni on, just to pick it off for her later. It kept the pizza cooking more evenly.

Saturday, April 5, 2008

Better than Anything Cake

In Utah, you'll find interesting names for things. While anything good is typically compared with sex, that's a taboo word among most Mormons. I used to find this a bit silly, but do find now with young children that it causes too many questions to give a favorite dessert such a name. I honestly think that desserts should have descriptive names, but "chocolate cake infused with caramel topped with whipped cream and toffee bits" seems a bit long. So, I liked Melissa's choice of names for this cake last night, calling it "Better than Anything". While I'm sure I can think of a few things better than this cake, last night it totally hit the spot. And to think, just a year ago I thought good gluten-free cakes were impossible. I must thank the ladies at eattingglutenfree.com for their excellent chocolate cake recipe that I have used as a base for so many of my favorites.

Gluten Free Chocolate Cake

1 ¾ c. GF flour
½ tsp. xanthan gum
2 c. sugar
¾ c. cocoa
1 ½ tsp. baking soda
1 ½ tsp. baking powder
1 tsp. salt
2 eggs
1 c. sour cream
½ c. oil
2 tsp vanilla
1 c. boiling water


Preheat oven to 350°. Combine dry ingredients in a medium bowl. Beat eggs well. Add sour cream, oil, and vanilla. Beat in dry ingredients. Slowly add boiling water, and mix well. Batter will be extremely thin. Pour into a greased and featherlight floured pan. (*You can use any type of GF flour to flour your pan- I just like the featherlight. Or you can just spray the pan with Pam.)

Bake a 9x13 pan for 35-40 min. Bake a 13x18 pan for 17-20 minutes.
I did use a touch less sugar in the base cake. Then immediately after taking it out of the oven and using a big wooden spoon, poke holes throughout the cake. Promptly fill those holes with some sort of caramel ice cream topping. I used Smucker's and it appears to be gluten-free. Then, let it cool. Directly before serving, I whipped up a pint of heavy cream with about a tablespoon of sugar and a teaspoon or two of vanilla. Once whipped I spread this over the cake and covered it with heath bar toffee bits.

Pastry Puff amended

I opted for the addition of some almond icing to jazz this one up a bit. It made it much more appealing to Eowyn who immediately asked for more. It didn't disappoint. I used 2 T butter, 1/2 cup powdered sugar, 1/2 capful of almond extract, and then added a bit of whole milk. Then a bit more to my desired consistency. I put it in a ziplock bag and then cut off the corner to drizzle on the pastry. I cut the hole a little too wide, I'd rather have a tighter, drip, but this is what I got.

Pizza, Glorious Pizza


Pizza was always a Kramer specialty. I was born in Chicago, and so we'd make really good deep-dish mouthwatering pizza. It was what I made to impress people: pizza and cheesecake. So, it was a bit of a sore-spot in my early marriage when John didn't care for my pizza. Little did I know it was because the wheat-based crust was attacking his body. Well, I was more than pleased when Brent moved in with us and adored my pizza. Yes, I would make it just for him. Is that an awful confession that I was baking for my brother-in-law because he appreciated it more than my husband? Well, now that I finally found a great recipe, John craves my pizza. It is now bringing me gluten-free fame. The above images are from last night's pizza, so it doesn't look as appetizing as when it's hot and gooey from the oven, but I'm so image oriented that I needed to add something. That is one thing truly-lacking from gluten-free cookbooks: full-color, mouthwatering images. So, I hope to amend that on my own blog.

I found the crust recipe online actually:

Amazing Pizza Crust (Gluten-Free)
This recipe comes to us from Carol Fenster's cookbook: Special Diet Solutions.

1T gluten-free dry yeast

2/3 cup brown rice flour or bean flour

1/2 cup tapioca flour

2 tablespoons dry milk powder or nondairy milk powder or sweet rice flour

2 teaspoons xanthan gum

1/2 teaspoon salt

1 teaspoon unflavored gelatin powder

1 teaspoon Italian herb seasoning (I use the McCormick grinder, it's great!)

2/3 cup warm water (105 deg F)

1/2 teaspoon sugar or 1/4 teaspoon honey (I use more like 2T sugar)

1 teaspoon olive oil

1 teaspoon cider vinegar

Preheat oven to 425 degrees.

In medium mixer bowl using regular beaters (not dough hooks), blend the yeast, flours, dry milk powder, xanthan gum, salt, gelatin powder and Italian herb seasoning on low speed. Add warm water, sugar (or honey), olive oil, and vinegar. Beat on high speed for 3 minutes. (If the mixer bounces around the bowl, the dough is too stiff. Add water if necessary, one tablespoon at a time, until dough does not resist beaters.) The dough will resemble soft bread dough. (You may also mix in bread machine on dough setting. ) Put mixture into 12-inch pizza pan or on baking sheet (for thin, crispy crust), 11x7-inch pan (for deep dish version) that has been coated with cooking spray. Liberally sprinkle rice flour onto dough, then press dough into pan, continuing to sprinkle dough with flour to prevent sticking to your hands. Make edges slightly higher to contain toppings.

Last night I used one of Mom's tricks in sprinkling the Pam-coated pan with cornmeal which made it easier to spread the dough out on the pan without it sticking. This is no mean task. I use Bette Hagman's trick of putting my hand in a plastic bag while spreading out the dough. I then sprinkle the dough with Parmesan and Romano cheeses for a good rich flavor.

Bake the pizza crust for 5-10 minutes. Remove from oven. Spread pizza crust with sauce and toppings. Bake for another 15-25 minutes or until top is nicely browned. Just keep checking so that the crust doesn't burn

This is really good! Boboli's prepared sauce is gluten-free and I really love the flavor. Since it takes so long to put everything together, I don't bother with my own sauce, though I may work on that again in the future and add it. Last night's pizza had roasted red peppers, Turkey pepperoni, and sautéed sweet onions and baby bella mushrooms. It was great!

Foray into gluten-free blogging

I have a few people who've been trying to get me to write a cookbook for about a year now, and I'm daunted by the work involved. So, I figured this is a step I can more readily take. I've blogged about the family with a vengeance for a while now, sneaking in recipes and food comments every now and then, but have decided to branch out and try a true recipe blog. It will of course be filled with nostalgia and anecdotes, as anything written by me would, but will hopefully include beautiful pictures and recipes in progress of my gluten-free baking trials. I hope you enjoy!

Danish Almond Pastry Puff

My family traditions center around food. I can't even remember when Mom started this, but for years now, every six months for General Conference Mom makes Danish Almond Pastry puff as part of the big brunch spread at their house for the Sunday morning session. So, every time conference is nearing, I start to have a hankering for the pastry. And pastry isn't something accessible in gluten-free baking. Although, after having a conversation with Mom about it, I decided that maybe it wouldn't be so difficult after all. Mom has too much confidence in me for my own good, but it's now baking, and we'll see how it works.
So, it's completed, and pretty-darn good for gluten-free. First I'll type in what I actually did, and then I'll add what I think, upon tasting it, will make it superb the next time around.

Danish Almond Pastry Puff

1/4 cup butter-flavored crisco, cut into small cubes
1/4 cup unsalted butter, cold, cut into cubes
1 cup Featherlight flour mix
1/2 tsp xanthan gum
1 teaspoon cider vinegar
2 T ice-cold water

Cut butter into flour and xanthan gum with pastry cutter until fine. Add the cider vinegar and the water and mix with a fork until it forms a ball. Divide the ball in half. On ungreased baking sheet pat each portion of dough with hands into 12"x 3" strips about 3" apart.

1 c water
1/2 c butter
1 c GF flour
1 tsp almond extract
4 large eggs

In saucepan bring the water to a boil; add butter; cook until melted. Add the flour all at once, cooking and stirring with wooden spoon until mixture pulls away from sides of pan to gather into smooth ball. Remove pan from heat; stir in almond extract. Add eggs, one at a time, beating after each until smooth. Divide dough in half; spread each half evenly over one pastry strip. Bake in 350 degree oven for 50 min or until golden brown and cooked through. (the pastry looked golden to me at about 35 min in, but I kept cooking it as it wasn't deepening in color, and I wanted to be sure the center was cooked, the original recipe called for an hour of baking)
Confectioners’ sugar icing:
1/2 C powdered sugar
2 T soft butter or marg.
1 to 2 T water
While still warm, frost with confectioners’ Sugar Icing; sprinkle generously with sliced almonds (I toasted mine before sprinkling). Cool; slice diagonally to serve. For tea table, cut pastries in half lengthwise before slicing diagonally to make finger puffs.

Although I hope the flavors might mature upon sitting, the almond flavor isn't a strong as I would like. So, these are my future ideas. My first plan was to add some almond extract to another small batch of an icing glaze to add to the top of the pastry, but then John mentioned almond paste, which is one of my favorite things in the world. We have another old family recipe for crescent rolls that we line with an almond filling and bake that we used to have for Christmas breakfast, that I think would make this quite good. So, essentially, take a small chunk of almond paste and mix it with an egg white (as you would in making a marzipan). Just use a fork in a small bowl, once the egg white has softened the almond paste so be spreadable, spread it along the center of the first layer of pastry, then top with the second layer of puffed pastry and bake. I think that will complement this nicely and give it a really great almond flavor. I tried this last suggestion this weekend, and it didn't work so well. Somehow the layer between the two types of pastry affected the way the top puffed, and so I wouldn't recommend it. What I do think is that the almond paste in the pastry puff needs to be increased to at least 2 tsp to compensate for the stronger flavor of the rice flours, and that the icing on top must have the almond extract in it.

Obviously, this is not an everyday thing, but it's really not as difficult as it sounds, and it's something I hithertofore though impossible of gluten-free baking.