Monday, November 23, 2009

Gluten Free German Chocolate Cake

I've only made German Chocolate cake once before, but I just used a gluten free mix, and I wasn't that impressed with it. I know that my sister loves to make this for her family because it's surprisingly easy to make it dairy free as well with some simple substitutions.
I was debating which recipe to use for the cake when I noticed that Bette Hagman's recipe was almost identical to the recipe found in the package of Baker's Sweet German Chocolate that I was going to use, except she added the eggs whole instead of separating them, so I used her recipe. I did however use the Baker's method of creating three layers and their recipe for more of the coconut-pecan frosting. It was a big hit at my house.

German Chocolate Cake

2 1/4 cups GF mix
1 1/4 tsp xanthan gum
1 1/4 tsp baking soda
1 tsp baking powder
1 tsp Egg Replacer
1/2 tsp salt
4 oz Baker's Sweet German Chocolate
1/2 cup hot water
1 cup butter
2 cups sugar
4 eggs
1 cup buttermilk
1 tsp vanilla

Preheat oven to 350 degrees. Grease three 9" cake pans.
In a medium bowl, combine the dry ingredients (from flour through salt). Set aside
In a microwavable bowl, combine the chocolate and hot water, and heat on medium power for about a minute, or until chocolate melts. Set aside.
In mixing bowl, cream the butter and sugar until light and fluffy. Add eggs, one at a time, mixing well after each addition. Pour in chocolate and vanilla and blend. Add the flour alternately with the buttermilk, in two additions. Beat on low speed until well blended. Spoon into prepared pans and bake at 350 degrees for 40 minutes, shifting pans around every ten minutes so that each bakes evenly.
Let cool in pans for 15 minutes, then turn onto cooling rack. Frost when cakes are completely cooled.
Coconut-pecan frosting
4 egg yolks
1 (12 oz) can evaporated milk
1 1/2 tsp vanilla
1 1/2 cups sugar
3/4 cup butter
1 7 oz pkg flaked cococut
1 1/2 cups chopped pecans

BEAT egg yolks, milk and vanilla in large saucepan with wire whisk until well blended. Add sugar and butter; cook on medium heat 12 min. or until thickened and golden brown, stirring constantly. Remove from heat.

ADD coconut and pecans; mix well. Cool to room temperature and of desired spreading consistency.

Once frosting has cooled, spread in thirds over top of each layer of cake. Serve and enjoy!

Monday, September 21, 2009

Gluten Free Pumpkin Cookies

Ever since we went to Disneyworld last year our kids love Mickey, especially Lulu the two year old. On a Mickey Mouse Clubhouse video we found a recipe for "Mickey's pumpkin cookies". The kids have been wanting me to try it out for a while now, but I just hadn't gotten around to it until tonight. It worked pretty well. I have also been trying to omit xanthan gum from recipes lately, but I did add some to part of the cookies. It really did help the shape of the cookie and I took pictures so that you can see the difference, but am having difficulty loading them. They were puffed in the center, but spread out about a quarter of an inch around the edge. They still tasted good, even if they didn't look as nice. I know that some people can't digest the gums, so I figured I'd do an experiment in case people out there can't use them.

1/2 cup margarine
1/2 cup sugar
1 egg
1/2 cup canned pumpkin pie filling
1/2 tsp vanilla
1 cup GF flour
1/2 tsp xanthan gum (if using)
1/2 tsp baking soda
1/4 tsp salt
1/2 tsp ground cinnamon
1/2 cup cinnamon chips (optional)

Grease cookie sheets and preheat oven to 350 degrees. Cream the margarine and sugar until light and fluffy. Add egg, pumpkin filling and vanilla. Mix well. Sift together dry ingredients, and add them slowly to the mixture. Drop by teaspoons onto greased cookie sheet; bake for 10 minutes until light brown and puffed. I added the cinnamon chips as an afterthought (at the same time as I added the xanthan gum), but I also think that pecans, raisins, or even chocolate chips would taste great in these cookies. The girls loved them.

Sunday, September 13, 2009

GF Southern Mac and Cheese

My kids love macaroni and cheese, what kids don't? Sometimes it's a nice meal for dinner, and although Annie's does make a gluten-free boxed option, it's not exactly what I'm craving for a real meal. In conseqeunce, I've tested a lot of recipes and come up with an amalgamation that I prefer. I found a recipe a few months ago for a more custardy base, that was indicated as a southern version of the classic. There are such great brown rice pastas out there that it's easy to swap them out for wheat pastas. This version was a winner at our house, so I thought I'd share it. I didn't measure everything out, so some of the measurements are approximations, but you get the idea. I feel that a lot of the fun of such comfort food casseroles is that you can work to make it your own.

8-10 oz brown rice pasta (elbow macaroni is most traditional, but I used small shells, Tinkyada makes great inexpensive versions of both)
1 Tbsp butter, melted
2 slices gluten free sandwich bread, torn
1 Tbsp butter (for frying pan)
1/4 cup diced sweet onion
1 3/4 cups shredded sharp cheddar (I used natural sharp cheddar, so it was white, but you really need to use sharp cheddar or the sauce is too mild and just not right, believe me, I've tried)
1/4 cup shredded parmesan cheese
2 eggs
1 cup half and half
1 clove garlic
salt and white pepper
1/4 tsp nutmeg (or to taste)
1/2 tsp thyme

Boil a large pot of salted water for cooking the pasta. Follow package directions, except to cook about three minutes shy of the suggested time, this will allow it to remain al dente, and not mush too much in the baking process. Preheat oven to 350 degrees.
Saute the onion in a small frying pan with some butter, until it's translucent. Remove to a large mixing bowl. Into the bowl add 1 1/4 cups sharp cheddar and the parmesan, half and half, beaten eggs, the pressed garlic clove and spices. Mix well. Once your pasta is done cooking, drain and add to the mixture in the large bowl. Mix to fully coat the pasta with the cheese mixture.
Pour pasta and cheese mixture into a 1 1/2 to 2 quart casserole dish. Top with the remaining 1/2 cup of cheese. In a food processor, pulse bread and the melted butter, until coarse crumbs form. Sprinkle the bread crumbs on top of the cheese layer. Bake in the oven for about 25-30 minutes, until the crumbs are golden and the cheese below is bubbly. Remove from oven and let sit for about 5 minutes before eating. Enjoy!

Thursday, June 11, 2009

GF S'More Cookies

When I got this month's issue of Everyday Food, I couldn't wait to try the cookie recipe. I love graham crackers, and even attempted to make my own gluten free version a few months ago, with disastrous results. Then I was glad to find some packaged ones in one of my local stores, but they were very expensive. I thought this was a great way to try and get the great taste of S'mores, in a little cookie. It was easier to modify than I thought, and did well gluten free. I'm not 100% satisfied with the recipe, but wanted to share it nonetheless.
1/2 cup Bob's Red Mill Gluten-free Rolled Oats
1 cup GF flour mix
1 cup dark Teff flour
3/4 tsp xanthan gum
1 teaspoon ground cinnamon
1/2 tsp baking soda
1/2 tsp salt
1 cup margarine, room temperature
3/4 cup light brown sugar
1 large egg
chocolate squares (I used Hershey's Special Dark 100 calorie packs, and cut each individual package of chocolate into fourths and put them on the cookies)
large marshmallows (I use the Wal-mart brand that says they're gluten free), halved horizontally

Preheat oven to 350 degrees. In a food processor, pulse oats until finely ground. Add flours, xanthan gum, cinnamon, baking soda, and salt; pulse to combine. In a large mixing bowl, beat butter and sugar until light and fluffy. Beat in egg, scraping down side of bow. With mixer on low, slowly add dry ingredients just until combined.

I tried to form small balls, about 1 teaspoon, and then drop them onto a cookie sheet. I lined one cookie sheet with parchment paper, and just sprayed the other with pam. The one with parchment paper just stayed a little softer and browned less. These cookies are very dense and nutty, and so I tried to make a smaller cookie, pushing it down flat, and then placing the square of chocolate on each cookie before placing it in the oven. The cookies will puff up a bit during baking, and don't spread much. I set the timer for five minutes, and then turned the pan to brown evenly, and set it for another five minutes. Then I cooked the second pan's worth the same way. If you're making the cookies small, then you'll be able to get at least 3 dozen. After all of the cookies were baked, I turned the broiler on. I took the halved marshmallows and placed them on the center of each cookie, and put one pan under the broiler. This doesn't take long , so I left the oven door slightly open and watched. To evenly brown, I also turned the pan around at least once while broiling.The cookie part is still a bit larger than I would like, and I think I'll try baking it with the butter after all to create a crisper cookie, but all in all this is a fun little cookie to add to a gluten-free repertoire.

Thursday, May 7, 2009

GF Pan-seared Tilapia with Green Beans and Grape Tomatoes

I wasn't sure that I was going to share this recipe because of a specific item that won't be available everywhere, but it really does taste great and I think it could be easily adjusted.
I really do love Wegman's grocery stores, especially for all of the gluten-free items they sell, not to mention the fact that their store brand has codes on the front of their packaging, including a little yellow G on all the gluten-free items.
Wegman's sends me a magazine occasionally with great recipes. And this comes from one. The original recipe is not Gluten-free, but it was easy for me to modify.

12 oz green beans, cleaned, cut and trimmed
4 tilapia fillets (about 6 oz each)
1/4-1/2 cup Four Flour Bean Mix (I've learned it works the very best for browning meats)
1 Tbsp Pure Olive Oil
1 Tbsp Wegmans Basting Oil (I just use canola oil for a different flavor)
1 tsp butter
1 pint grape tomatoes, halved (this time I used cherry tomatoes and quartered them)
2 Tbsp Wegmans Lemon-Dill Finishing Butter (This is obviously the reason I wasn't going to share this, but you could add your own dill, lemon, butter and some garlic, and it would probably give you a similar effect)


  1. Blanch green beans 1-2 min in large pot of boiling, salted water. Drain; set aside.
  2. Dust tilapia with flour. Pat off excess.
  3. Heat olive oil in skillet on MEDIUM-HIGH, until oil faintly smokes; add fish.
  4. Turn over when fish changes color one-quarter of the way up and seared side has turned paper bag-brown, 2-3 min. Reduce heat to MEDIUM.Cook 3-5 min, until internal temp reaches 120 degrees; check by inserting thermometer halfway into thickest part of fish.
  5. Add basting oil and butter to pan. Swirl. Baste with spoon, 1-3 min, until internal temp reaches 130 degrees. Transfer to clean platter; let rest at least 2 min.
  6. Add green beans, tomatoes, and lemon-dill butter or citrus soy sauce to pan; heat, stirring, 30 seconds. Serve over tilapia.
My whole family loves this meal, even my two and five year old daughters. We served it with some fresh corn on the cob tonight and it made for an easy cheap, and fairly healthy gluten free meal. I hope that this helps some of you to figure out another good meal.

Tuesday, April 21, 2009

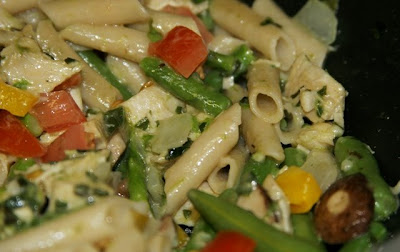
GF Penne and Fresh Vegetable Skillet Toss

I've been meaning to share some of my favorite main dish recipes for a while, because I understand that sometimes its those day to day GF recipes that can be harder to figure out than the special ocasion baked goods. As you can see, I'm not so good at naming recipes, but this is one of my favorite dinners because of its versatility. It started as a bland pasta side dish recipe from a Weight Watchers cookbook, but has evolved into a beautiful, tasty, and easy main dish, that I hope retains a lot of the healthful aspects. Also, as a celiac, Italian restaurants are pretty much out of the question, but this is a great dish that tastes like something you might get at an Italian place.
First off, you need to start with a great GF penne pasta. I love DeBole's rice pasta because I can get it at Walmart, usually for less than $2. Then, it just depends on what kinds of veggies are available. I really don't measure things out, and I love to have a variety of stuff, so I never quite make this the same, but I'll do my best to help you all recreate it.

For my family of four I used:
4 oz penne pasta
10 spears asparagus, ends cut off and cut into 1 1/2 in pieces
small handful of fresh green beans, tips trimmed and cut into 1 1/2 in pieces
2 TBSP olive oil
2 cloves garlic
1/4 cup diced sweet onion
1/2 cup diced sweet pepper (I used yellow for color)
1/2 cup sliced baby bella mushrooms
1 cup diced cooked chicken (I love to use up leftover chicken, or turkey, whatever I have)
1/4 cup fresh basil, chopped
2 TBSP chopped fresh Italian parsley
1/2 tsp thyme
1/2 cup mixed shredded cheeses (it depends on what strong cheeses I have: Parmesan, asiago, romano, and even provolone)
1-2 large tomatos, diced

Okay, I hope that wasn't too confusing. Now, for the actual cooking.
1. Put a large pot of salted water on to boil. While it's boiling, start to chop up the vegetables, starting with the asparagus and the green beans. You'll have to adjust this next part based on the cooking time for your pasta. The DeBole's pasta only needs to cook for 5-7 minutes, and the green vegetables only need to be cooked for about 5 minutes of that time. I put the pasta in for two minutes, then add the green vegetables and cook for another 5 minutes.
2. Drain the pasta, reserving about 1/2 cup of the cooking liquid.
3. Meanwhile, heat the olive oil in a large, deep stir fry pan. Once the oil is hot, add the crushed garlic to the pan, and then add the onion, peppers and mushrooms for sauteeing. After these begin to soften, I like to add the meat to heat it up, and soften it a bit in the oil.
4. Add the pasta and green vegetables, along with the reserved cooking liquid. Season with salt and pepper and stir until liquid is reduced.
5. Add the herbs and cheeses and mix until cheese is melted. Lastly, I add the tomatos so they stay firm and fresh.
Really, the fun of this is the experimentation. I always be sure to have the green beans, asparagus and tomatoes, but it's great to add more variety. My little children also love this meal, so it's a great way to get them to eat vegetables, and like it.

Wednesday, February 25, 2009

GF Peanut Butter Chocolate Monkey Cake

My baby turns 2 today, and to celebrate my wild child, I decided on a monkey cake. She's really a climber, and gets into everything, and so she's my monkey. I found some cute ideas on the web, and then adjusted them to my own tastes, as well as making it gluten free. If you can't tell by now, special occasion cakes are my favorite, and I really love making cute cakes for my kids, but they still have to taste delicious.

I started off with my favorite chocolate cake recipe. These girls developed such a great recipe, that I just don't mess with it. Now, I didn't want a full two layer cake for this and so I actually ended up shaving cake off each 9 inch layer, and putting the leftovers in tupperware to save for a trifle later. For 2 9in round cake layers I bake them for 25 minutes, especially when I'll be cutting some off, it's best to make sure that the cake cooks completely and doesn't sink in the middle.

After letting the cake layers completely cool, I made the peanut butter frosting. I thought that peanut butter would be the perfect complement to my chocolate cake, and that it would be just the right color for my monkey's face. I'm always looking for great new frosting recipes, and therefore I'm usually trying new ones out while I'm making something special like this. I tried a recipe from the Cake Doctor that was really great before, but wanted to try something new. Martha Stewart Living last month had a whole section on cupcakes, and I decided to try out her frosting recipe, it looked like a good color for what I wanted. So, I used her recipe. I covered the entire cake with it, and while it was still soft, drew a face outline in the cake, and placed my chocolate wafer eyes on it for a reference point. I was honestly a little bit disappointed in the flavor, which I found wasn't sweet enough. I had intended to cover the cake with chocolate frosting, but wanted to make sure that it would taste really great to bring the whole cake together. I really wanted to use a ganache, because I happened to have plenty of heavy cream on hand, and decided that I would just let it cool in the fridge for a while, and try it out.

3/4 c heavy cream
8 oz (1 1/2 cups) Hershey's special dark chocolate chips
1 Tbsp corn syrup
1 tsp vanilla

Heat the cream in a small saucepan over medium heat until it starts to boil. Be sure to stir the cream so that no skin forms on it. Remove from heat and pour over the choloate chips and add the corn syrup. Stir until chocolate melts and mixture is smooth. You can leave it like this, but I added the vanilla to make it a touch sweeter. Stir the vanilla in after it's smooth.
In order for me to be able to use the ganache as a frosting, I let it cool in the refrigerator for 20 minutes. Then, I simply used a butter knife to spread it around the face, and then down the sides. I then spooned a small amount into a ziplock sandwich bag, cut the tip off, and drew in the simple nose and mouth. I baked my favorite flourless peanut butter cookies, and pushed them into the sides of the cake to create the ears.

It's a simple, fun kid's birthday cake, that I'm also planning will taste wonderful for all the grown-ups who'll be eating it.By the way, everyone loved the cake, though the adults appreciated it the most. I thought it was worth adding a cutaway of the cake to see the layers of the peanut butter frosting and the texture of the cake. Wouldn't even know it was gluten-free!